
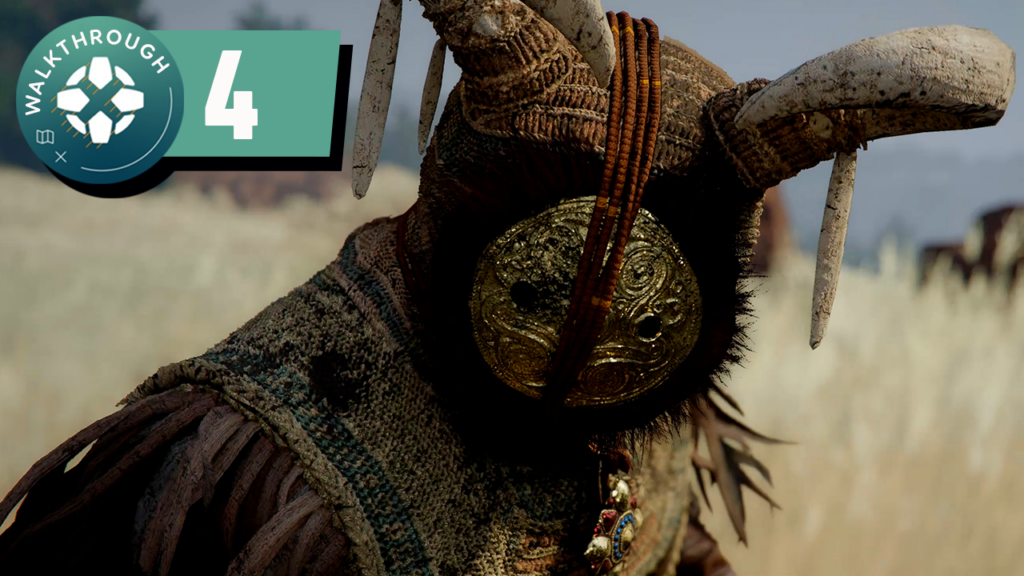
 In the second part of our Chapter 3 walkthrough, we start by going to the Sunrise Plains to complete one more puzzle, and then we go back to the boss arena we uncovered last video to finally do the Devil of the Reed boss fight. After that, we do the Shakatu side mission (Extinguishing the Last Flames) before showing how to send people at your camp on missions. During the downtime while that mission is happening, we showcase some “best practices” for how to spend your time in town between major missions before doing the Pororin side quest so we can enter that town in the future without being knocked out.00:05 – Going to another puzzle after starting at the Pororin Forest fast travel location02:25 – Get a really good random drop here from the Fundamentalist Goblin enemy type (Crude Devil Mask)02:45 – Burn the vines to reveal the puzzle location (Grace Estate, Sunrise Plains)05:00 – It’s a quick solution if you only move the correct statues from the start06:16 – Abyss Cresset of Sunrise Plains solved (The Mystery in the Forest Puzzle Challenges)06:44 – From here, once you’re comfortable with the amount of food you have and have upgraded your gear as much as you want at the Smithy, head back to the boss arena for the Devil of the Reed boss fight that we got to last video. We recommend grabbing the Lariat skill from the blue part of the skill tree as well (if you have not yet), plus at least one way to counter his attacks, which includes a Shield Bash or with a perfectly timed block/parry06:57 – Reed Devil boss fight (The Face Behind the Mask mission COMPLETED at end of it)16:12 – Pioneering main mission acquired16:15 – We’ll head back to camp in a second, but we’ll identify another Copper Ore location and get another Sealed Abyss Artifact first since they’re right here18:45 – Sealed Abyss Artifact (Desperate Rescue)19:08 – Now head back to your camp to trigger the next part of the main mission24:03 – After fast traveling, We’ll detour now and do a side quest (Extinguishing the Last Flames)27:23 – First speak with Nogle and investigate the scene30:23 – Next we’ll go to talk with Kathan and investigate the scene33:03 – We’ll detour and do the main mission (Rumors From the Sawmill) for a second as it’s on the way to the next part of the side quest anyway35:05 – Luke and Ronald are the first two Greymanes you’ll be able to send out on missions from the camp35:37 – Back to the side quest, we’ll go to Grimzle next36:35 – Speak to Grimzle and investigate the scene38:46 – Now head to talk to Blique39:41 – Talk to Blique and investigate the scene41:43 – Finally, go and speak with Skrav43:03 – Can go to Bruna on the way if you haven’t bought your horse anything yet44:57 – Speak with Skrav and investigate the scene47:37 – Now head back and report to Shakatu48:29 – Here are the correct answers to tell Shakatu51:21 – Now we go and hunt down the traitor56:00 – Extinguishing the Last Flames side quest COMPLETED56:45 – Now head back to camp and examine the dragon head to continue the main mission57:56 – To dispatch people for the Howling Hill expansion mission, open your map and find Howling Hill and then click the “Inspect” button59:15 – You can make time pass by waiting at the pot in camp, or sleep in your bed in your home right across from the camp.1:00:10 – There is a little extra time to kill, so if you don’t know how to feed your horse (or various other animals to help give them loyalty) here’s a quick tutorial. We go to Annabella near your camp to show this off. Feeding your horse will give it health back or give it attribute boosts (depending on the food)1:01:55 – During any downtime, we recommend heading back into town and checking with the Smithy to see if you can upgrade anything and also stock back up on food1:02:20 – If you want some extra money, head up to the Bank and rob the entire back room. The Strongboxes don’t seem to respawn after you steal them once so this is a one-time trick for the most part1:08:30 – As for the Bank, once you have enough money to start making Gold bars, then it’s worth investing. You can “save scum” right before the investment pays out, so if you lose money just reload the save until you get a good outcome1:09:05 – We’ll do one more side mission we started last video and that is the Trembling Woods for the Pororin Forest Guardians as this will allow us to enter that town without being knocked out1:12:40 – Trembling Woods side quest updated1:13:38 – Wait around for the creature to show up in the valley1:16:30 – Trembling Woods side quest complete, can now enter Pororin Forest without danger1:17:02 – Can also find an Abyss Nexus fast travel (Where Sky Meets Earth) if you climb from where you handed in the relic (Wells Estate/Trembling Gorge)1:21:14 – Head back to your camp to wrap up Chapter 3
Crimson Desert Walkthrough – Howling Hill, Chapter 3 (Part 2)
Posted by
 1
1
Post navigation
Previous Post
 Crimson Desert Walkthrough – Prologue and Chapter 1
Thanks for sharing this walkthrough! It’s great to see detailed guides for games like Crimson Desert, and I’m sure many players will find this helpful. Looking forward to more insights in the future!