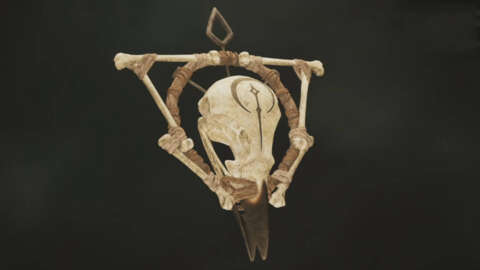
In Crisol Theater of Idols, Crow Relics are the required currency to unlock skills at La Plañidera’s shop. These skills include increasing the speed of using a syringe to recover health, giving yourself a chance not to consume a projectile that hits an enemy, or even reducing the amount of health lost when using blood to reload a gun. You only need 31 of the 35 Crow Relics to unlock the skill tree fully, but many of them are missable if you progress too far into each level.
The only Crow Relics that we won’t be telling you where to find them are the ones you get as rewards for unlocking the Solari chests at the fair. You can use the Crisol Theater of Idols Solari Broach locations guide to find the necessary items needed to pick up the remaining Crow Relics, and some of them are pretty well hidden. If you’re seeking either collectable out, we recommend that you save often, as this horror game loves to block off paths permanently. Here, then, are all of the Crisol Theater of Idols Crow Relic locations:
Tormentosa Fair #1

Complete the minigames at the Tormentosa Fair to win tickets. You can redeem them at the vendor to the east of the minigames to win a Crow Relic in exchange for 500 Tickets.
Mermaid District #1 (Floor 1)

As soon as you’re blocked from continuing your pursuit of Herminia Espina, you will have to travel through a series of barns to get to the market district. Eventually, you’ll run up a ramp to find a room full of dead pigs and chickenwire gates. There is a small table with a candle lit underneath a wheel. Head downstairs and continue until you discover a closed door that leads to a balcony and a hoppable wall. Instead of going through this door, double back and pass through the open door leading to a balcony instead, and in the room ahead, you’ll find the Crow Relic.
Mermaid District #2 (Tablao Zafiro Floor 2)

While exploring the Tablao Zafiro, you can find a Crow Relic in the right-hand toilet stall in the western bathroom. You’ll want to kill the enemies in the main bathroom area first before picking this one up.
Mermaid District #3 (Floor 0)

While heading toward the La Perla Oculta via the southern path near El Cuerno Albino, you’ll be ambushed by Dolores, forcing you to hide from her gaze. As you sneak around, from where you have to push the mine cart with the yellow tarp to the other side of the area, there is a freight lift on the right side and scaffolding to the left. Among the scaffolding, there is a second mine cart. Push it forward and open the chest next to a barrel on fire in the small room to find the Crow Relic.
Mermaid District #4 (La Perla Oculta Floor -1)

As you explore La Perla Oculta’s rooms, you’ll likely notice the Crow Relic through a set of ajar double doors in the lobby. To get here, go through the door leading to the elevator and turn left. This leads to a set of peepholes. Go through the narrow gap to the left and kill the enemies nearby. As you head south, there are two unlabeled doors. The one on the left has some enemies and the Crow Relic.
Mermaid District #5 (Floor 0)

In the courtyard where you find the Solari corpse near the memory of the agent warning his parents to get to safety, there you’ll find a shop. Once you’re inside, there is a door to the right. Pass through it and defeat the two enemies inside, and you’ll find the Crow Relic resting on a crate.
Mermaid District #6 (La Fortuna Esmeralda Floor 1)

Inside La Fortuna Esmeralda, from the downstairs room with the dominos, head through the door to the east and defeat the enemies in the subsequent rooms. You’ll find the Crow Relic on a desk with the Bingo board behind it.
Ram District #1 (The Dam Floor 2)

Heading around toward The Dam via Sector A, once you find the sniper rifle, head along the long road across the dam, heading north. You’ll pass a truck stuck in the building on the other side of the bridge to the right. Inside, there is a motorbike sharpening vendor next to it. From here, head through the next room, and you’ll find a bricked wall to the right with a shut gate.
On the right is a fuse panel, to which you need to have the switches from left to right: Off, On, On, Off. This will reach the 100-point threshold and automatically open the gate. Here, you’ll find several useful items, including one Crow Relic.
Ram District #2 (The Dam Floor 2)

Inside the Fierro Blanco Construcciones warehouse, toward the southeast corner, you’ll find a small gap underneath a raised crate next to a shipping container. Crawl through the gap outside and head inside the small room to find a chest with the Crow Relic inside.
Ram District #3 (The Dam Floor 1)

After picking up the Wrench, head through the locked door and back onto the Dam bridge. Continue east, and when you reach the next building, head downstairs. There’s a burst gas pipe that you can turn off with your Wrench. Head into the office and open the cabinet to find the Crow Relic. This room also has a Vinyl Record on the turntable.
Ram District #4 (El Picadero)

Head into Sector B, and once you’re outside, go to the shipping container in front of you, past the makeshift workshop. On the other side, you’ll find a fuse box. The combination to open this one is, from left to right: On, On, Off, On. Once inside, jump into the vent to the right and crawl through to the locked room on the other side. Head upstairs and you’ll find a Holy Blood on a shelf and a chest containing some Silver Bulls and the next Crow Relic.
Ram District #5 (El Picadero)

Continue on the path in Sector B, and eventually you’ll come across a warehouse. Open the double doors, and you’ll find a memory of a worker threatening his boss. Nearby is a vent you need to wheel a mine cart to reach. Head through it, and you’ll emerge into a room with some tracks. Follow the tracks, and on the right wall, you’ll find an oil drum. Inside, you’ll find the Crow Relic.
Ram District #6 (The Dam Floor -2)

After getting Switch D, you’ll find a set of sewers with gas leaks. Circle to the northwestern room before you activate the gates to escape, and you’ll see a small gap next to some iron bars. There are two posters to the right of this gap. Head through and open the chest for the last Crow Relic of this area.
Anchor District #1 (Floor -1)

In the central hub area for the Anchor District, hop on board the boat. Instead of heading north, head south into the cave and dock at the port nearby. Smash the wooden boards and climb through the narrow gap. Kill the enemies that appear around the corners, and you’ll find a chest containing a Crow Relic and a Maremanto page.
Anchor District #2 (Tower of Judgement Floor 6)

After picking up the Small Ship’s Wheel and lowering the bridge to the Tower of Judgement, follow Admiral Castigo up to the top. Complete the puzzle on Floor 7, then descend into the dilapidated prison below. You’ll see that there’s a small hole in the rock, which has a flame trap on the other side. Head north instead and past the locked door, opening the chest to collect the Crow Relic.
Anchor District #3 (Tower of Judgement Floor 3)

This one is incredibly easy to miss. As you follow the path down through floor 3, there is a series of flame traps you need to avoid. As the path loops on the northern-most part of the map, shortly after clambering through a narrow gap, there is a flame trap. From here, hug the right wall, and you’ll find the Crow Relic on the ground inside a small cave. Don’t drop into the next puzzle room before picking it up, as you won’t be able to get back.
Anchor District #4 (Tower of Judgement Floor 3)

After solving the puzzle on Floor 3 and collecting the Admiral’s key, continue onward across the chasm. When you reach a drop, leading to a fight with a Petréo, instead of jumping down, turn around and crawl through the hole in the wall. This leads to a chest that has the Crow Relic. Jumping down the gap will mean you can’t return ever again, so make sure you pick this up.
Anchor District #5 (Floor 0)

Once you have the Octopus Valve from the Tower of Judgement, you’ll return to the central area. Head for the lodge to the south of your location and open the locked door with your Octopus Valve. Inside, you’ll see a puzzle. The idea is to light up all the nodes by switching on and off segments. We recommend that you light up all of the bordering lights first before proceeding to fill the inside. Complete this puzzle, and you’ll find the Crow Relic inside a chest, along with some Silver Bulls and a Holy Blood flask.
Anchor District #6 (Floor 0)

After grabbing the Octopus Valve, you need to unlock the sealed door to the east of the main hub area, back towards where you killed Padre Arroyo. From here, head outside along the path until you see a wheel. Turning it will open a locked gate leading to the northern-most area of the map. Use the shortcut to head back to the boat if you left it where you originally found it, or find the boat at one of the other docks if you moved it. From the original dock, you want to head north and take the right-hand path. Follow it along, through the gate, and dock the boat. Climb up the ledge, and you’ll find the Crow Relic on the closed-up well.
Anchor District (Tomb of Dolores Floor -5)

As you explore the Tomb of Dolores at the end of the level, you’ll encounter a network of prison cells across a bridge, straight after a room where you fought some Vidrieras (the stained-glass enemies that look like Dolores). Look for an open door, then double back to head north. Inside that cell, you’ll find the last Crow Relic on a prisoner’s corpse.


